How To Build Simple Node.js Rest APIs with Express, Sequelize & MySQL
We’ll be start to build a Node.js Rest API with Express, Sequelize & MySQL. Here we’ll use Sequelize for interacting with the MySQL instance.
Required applications
- Docker is a set of platform as a service product that uses OS-level virtualization to deliver software in packages called containers. Containers are isolated from one another and bundle their own software, libraries and configuration files; they can communicate with each other through well-defined channels.
- Node.js is a platform built on Chrome’s JavaScript runtime for easily building fast and scalable network applications. Node.js is an open-source, cross-platform runtime environment for developing server-side and networking applications.
- ExpressJS is one of the most popular web frameworks for node.js. It is built on top of node.js HTTP module and adds support for routing, middleware, view system, etc. It is very simple and minimal, unlike other frameworks that try to do way too much, thereby reducing the flexibility for developers to have their own design choices.
- Sequelize is a promise-based Node.js ORM for Postgres, MySQL, MariaDB, SQLite, and Microsoft SQL Server. It features solid transaction support, relations, eager and lazy loading, read replication and more.
- CORS is a node.js package for providing a Connect/Express middleware that can be used to enable CORS with various options
- body-parser Parse incoming request bodies in a middleware before your handlers, available under the
req.bodyproperty. - Postman is an API(application programming interface) development tool that helps to build, test and modify APIs.It has the ability to make various types of HTTP requests(GET, POST, PUT, PATCH, etc.).
Node.js Rest CRUD API overview
We will build Rest Apis that can create, retrieve, update, delete and find posts by title.
First, we start with an Express web server. Next, we add configuration for MySQL database, create Post a model with Sequelize, write the controller. Then we define routes for handling all CRUD operations (including custom finder).
The following table shows overview of the Rest APIs that will be exported
| Methods | Urls | Actions |
|---|---|---|
| GET | api/posts/all | Get all Posts |
| GET | api/posts/:id | Get post by id |
| POST | api/posts/create | Create a new post |
| PUT | api/posts/update/:id | Update post by id |
| DELETE | api/posts/delete/:id | Delete post by id |
| DELETE | api/posts/deletealls | Delete all posts |
| GET | api/posts/published | Get all published posts |
| GET | api/posts?title=’test’ | Get all posts which title contains 'test' |
| GET | api/posts/publisher?name=christos | Get All posts where publisher name is 'christos' |
This is our project structure:

Now let’s start Creating Node.js App
First, we create a folder:
$ mkdir node_rest_api_with_mysql
$ cd node_rest_api_with_mysql
Next, we initialise the Node.js App with a package.json file:
npm init

name: (nodejs-express-sequelize-mysql)
version: (1.0.0)
description: Node.js Rest Apis with Express, Sequelize & MySQL.
entry point: (index.js) server.js
test command:
git repository:
keywords: nodejs, express, sequelize, mysql, rest, api, docker
author: Christos Ploutarchou
license: (ISC)

Is this ok? (yes) yes
If your already have MySQL installed on you PC you can ignore following Steps
Next, need to install docker for mysql and phpMyAdmin.
- Install Docker (Learn more about docker installation here)
- Enter on the project root directory
- Up the compose
docker-compose up -d
- Access phpmyadmin
your_ip:8183
Server: mysql
Username: root/root
Password: root/pass
- Access mysql on terminal
docker exec -it mysql_container_name mysql -u root -p
Docker phpmyadmin ENV
| PMA_ARBITRARY | when set to 1 connection to the arbitrary server will be allowed |
| PPMA_HOST | define address/host name of the MySQL server |
| PMA_PORT | define port of the MySQL server |
- If you need more information about phpmyadmin image. READ HERE
- If you need more information about mysql image. READ HERE
We need also to install necessary modules: express, sequelize, mysql2 and body-parser on our project.
Run the command:
npm install express body-parser cors sequelize mysql2 --save
When installation finish package.json file should look like this:
{
  "name": "node_rest_api_with_mysql",
  "version": "1.0.0",
  "description": "Node.js Rest Api with Express, Sequelize, MySQL & phpMyAdmin .",
  "main": "server.js",
  "scripts": {
    "start": "nodemon server.js"
  },
  "repository": {
    "type": "git",
    "url": "git+https://github.com/cploutarchou/node_rest_api_with_mysql.git"
  },
  "keywords": [
    "node",
    "rest-api",
    "tutorial",
    "mysql",
    "phpMyAdmin",
    "docker",
    "node.js",
    "sequilize"
  ],
  "author": "Christos Ploutarchou",
  "license": "ISC",
  "bugs": {
    "url": "https://github.com/cploutarchou/node_rest_api_with_mysql/issues"
  },
  "homepage": "https://github.com/cploutarchou/node_rest_api_with_mysql#readme",
  "dependencies": {
    "body-parser": "^1.19.0",
    "cors": "^2.8.5",
    "express": "^4.17.1",
    "mysql2": "^2.1.0",
    "sequelize": "^5.21.5"
  },
  "devDependencies": {
    "nodemon": "^2.0.2"
  }
}
Setup Express web server
In our root directory need to create a new server.js file:
const express = require("express");
const bodyParser = require("body-parser");
const cors = require("cors");
const server = express();
const db = require("./models");
const corsSettings = {
  originL: "http://localhost:8081"
};

const api = require("./routes/index");
server.use(cors(corsSettings));

// Parse request of content-type - application/json
server.use(bodyParser.json());

// parse requests of content-type -application/x-www-form-urlencoded
server.use(bodyParser.urlencoded({ extended: true }));

create a simple route
server.get("/", (_req, res) => {
   res.json({ message: "Welcome to node.js rest api application. Created for learning purposes by Christos Ploutarchou" });
});

// set listening ports for request
const port = process.env.PORT || 8080;

server.listen(port, () => {
  console.log("Server running on port : " + port );
});
What we are doing here:
– import express, body-parser and cors modules:
- Express is for building the Rest apis.
- body-parser helps to parse the request and create the
req.bodyobject. - cors provides Express middleware to enable CORS with various options.
– create an Express app, then add body-parser and cors middlewares using app.use() method. Notice that we set origin: http://localhost:8081.
– define a GET route which is simple for test.
– listen on port 8080 for incoming requests.
Now let’s run the app by running the following command : node server.js.
Open your browser with URL http://localhost:8080/, you will see:

Yes Correct, the first step is done. We’re gonna work with Sequelize in the next section.
Configure MySQL database & Sequelize
In the root folder, we create a separate config folder for configuration with db.config.js file like this:
Note: If you don’t user project docker compose, Then need to update database info with your local environment credentials and info.
module.exports = {
  HOST: "localhost",
  USER: "root",
  PASSWORD: "pass",
  DB: "restapi",
  dialect: "mysql",
  pool: {
    max: 10,
    min: 0,
    acquire: 30000,
    idle: 50000
  }
};
The first five parameters are for MySQL connection.pool is optional, it will be used for Sequelize connection pool configuration:
max: maximum number of connection in poolmin: minimum number of connection in poolidle: maximum time, in milliseconds, that a connection can be idle before being releasedacquire: maximum time, in milliseconds, that pool will try to get connection before throwing error
For more information, you can visit API Reference for the Sequelize constructor.
Initialize Sequelize
We’re gonna initialise Sequelize in app/models folder that will contain model in the next step.
Now create app/models/index.js with the following code:
const dbConfig = require("../config/db.config");
const Sequelize = require("sequelize");
const database = new Sequelize(dbConfig.DB, dbConfig.USER, dbConfig.PASSWORD, {
  host: dbConfig.HOST,
  dialect: dbConfig.dialect,
  operatorsAliases: false,
  pool: {
    max: dbConfig.pool.max,
    min: dbConfig.pool.min,
    acquire: dbConfig.pool.acquire,
    idle: dbConfig.pool.idle
  }
});

const db = {};
db.Sequelize = Sequelize;
db.databaseConf = database;
db.posts = require("./Sequelize.model")(database, Sequelize);
module.exports = db;
Don’t forget to call sync() method in server.js:
const db = require("./models");
db.databaseConf.sync();
After that your server.js file must look like below:
const express = require("express");
const bodyParser = require("body-parser");
const cors = require("cors");
const server = express();
const db = require("./models");
const corsSettings = {
  originL: "http://localhost:8081"
};

const api = require("./routes/index");
server.use(cors(corsSettings));

// Parse request of content-type - application/json
server.use(bodyParser.json());

// parse requests of content-type -application/x-www-form-urlencoded
server.use(bodyParser.urlencoded({ extended: true }));

create a simple route
server.get("/", (_req, res) => {
   res.json({ message: "Welcome to node.js rest api application. Created for learning purposes by Christos Ploutarchou" });
});

// set listening ports for request
const port = process.env.PORT || 8080;

server.listen(port, () => {
  console.log("Server running on port : " + port );
});
db.databaseConf.sync();
Define the Sequelize Model
In models folder, create Sequelize.model.js file like this:
module.exports = (database, Sequelize) => {
  return database.define("restTutorial", {
    title: {
      type: Sequelize.STRING
    },
    description: {
      type: Sequelize.TEXT
    },
    published: {
      type: Sequelize.BOOLEAN
    },
    publisher: {
      type: Sequelize.STRING
    }
  });
};
This Sequelize Model represents restTutorials table in MySQL database. These columns will be generated automatically: id, title, description, published, createdAt, updatedAt.
After initializing Sequelize, we don’t need to write CRUD functions, Sequelize supports all of them:
- Create a new post :
create(object) - Get all posts:
findAll() - Update a post by id:
update(data, where: { id: id }) - Delete a post :
destroy(where: { id: id }) - Delete all posts:
destroy(where: {}) - Get all post by title:
findAll({ where: { title: ... } }) - Get all post by publisher name:
findAll({ where: { publisher: ... } })
These functions will be use it on our Controller.
Create the Controller
Inside app/controllers folder, let’s create Post.js with these CRUD functions:
- create
- findAll
- findOne
- update
- delete
- deleteAll
- findAllPublished
- findByPublisherName
const db = require('../models')
const postObj = db.posts
const Op = db.Sequelize.Op

// Create and save new Post
exports.create = (request, result) => {
}

// Save Post object to db
postObj.create(post).then(data => {

}

// Retrieve all Post (Receive data with condition).
exports.getAllPosts = (request, result) => {

}

// Get Post object by ID
exports.getPostByID = (request, result) => {

}
// Update a Post object by the id
exports.updatePostByID = (request, result) => {

}

// Delete Post object by ID
exports.deletePostByID = (request, result) => {

}

// Delete All Posts objects from database
exports.deleteAllPosts = (request, result) => {

}

// Get all published Post
exports.getAllPublishedPosts = (request, result) => {

}

// Get all published Post by Publisher Name
exports.getAllPostsByPublisherName = (request, result) => {

}

// Get all published post by Title
exports.getPostByTitle = (request, result) => {

}
Now Let’s implement these functions.
Create a new post object
// Create and save new Post
exports.create = (request, result) => {
  if (!request.body.title) {
    result.status(400).send({
      message: "Content cannot be empty"
    });
  }

  // Create a Post object
  const post = {
    title: request.body.title,
    description: request.body.description,
    published: request.body.published ? request.body.published : false,
    publisher: request.body.publisher ? request.body.publisher : false
  };

  // Save Post object to db
  postObj.create(post).then(data => {
    result.send(data);
  }).catch(err => {
    result.status(500).send({
      message: err.message || "Some error occurred while saving."
    });
  });
};
Get all objects (By post title)
// Get all published post by Title
exports.getPostByTitle = (request, result) => {
  const title = request.query.title;
  postObj.findAll({
    where: {
      publisher: { [Op.like]: `%${title}%` },
      published: true
    }
  }).then(data => {
    result.send(data);
  }).catch(err => {
    result.status(500).send({
      message: err.message || "Something going wrong. Unable to retrieve data!"
    });
  });
};
On that function we use request.query.title to get query string from the Request and consider it as condition for findAll() method.
Get single post object (By post ID)
// Get Post object by ID
exports.getPostByID = (request, result) => {
  const paramID = request.params.id;
  console.log(paramID);
  console.log(paramID);
  postObj.findAll({
    where: { id: paramID }
  }).then(data => {
    result.send(data);
  }).catch(err => {
    result.status(500).send({
      message: err.message || `Some error occurred while retrieving data with id : ${paramID}`
    });
  });
};
Update a Post object by the id
// Update a Post object by the id
exports.updatePostByID = (request, result) => {
  const id = request.params.id;
  postObj.update(request.body, {
    where: { id: id }
  }).then(num => {
    if (num === 1) {
      result.send({
        message: "Post object successfully updated."
      });
    } else {
      result.send({
        message: `Cannot update Post object with id=${id}!`
      });
    }
  }).catch(err => {
    result.status(500).send({
      message: err.message || `Error while updating Post object with id=${id}!`
    });
  });
};
Delete Post object by ID
// Delete Post object by ID
exports.deletePostByID = (request, result) => {
  const id = request.params.id;
  postObj.destroy({
    where: { id: id }
  }).then(num => {
    if (num === 1) {
      result.send({
        message: "Post object successfully deleted."
      });
    } else {
      result.send({
        message: `Cannot delete Post object with id=${id}!`
      });
    }
  }).catch(err => {
    result.status(500).send({
      message: err.message || `Cannot delete Post object with id=${id}!`
    });
  });
};
Delete All Posts objects from database
// Delete All Posts objects from database
exports.deleteAllPosts = (request, result) => {
  postObj.destroy({
    where: {},
    truncate: false
  }).then(nums => {
    result.send({
      message: `${nums} Post objects was deleted successfully!`
    });
  }).catch(err => {
    result.status(500).send({
      message: err.message || "Cannot delete Post objects. Something going wrong}!"
    });
  });
};
Get all published Posts objects from database
// Get all published Post
exports.getAllPublishedPosts = (request, result) => {
  postObj.findAll({
    where: { published: true }
  }).then(data => {
    result.send(data);
  }).catch(err => {
    result.status(500).send({
      message: err.message || "Something going wrong. Unable to retrieve data!"
    });
  });
};
Get all published Posts objects from database
exports.getAllPosts = (request, result) => {
  postObj.findAll()
    .then(data => {
      result.send(data);
    }).catch(err => {
      result.status(500).send({
        message: err.message || "Some error occurred while retrieving data."
      });
    });
};
Get all Posts by Publisher Name
// Get all published Post by Publisher Name
exports.getAllPostsByPublisherName = (request, result) => {
  const name = request.params.name;
  const condition = name ? { publisher: { [Op.like]: `%${name}%` } } : null;
  postObj.findAll({ where: condition }).then(data => {
    result.send(data);
  }).catch(err => {
    result.status(500).send({
      message: err.message || "Something going wrong. Unable to retrieve data!"
    });
  });
};
Define Routes
When a client sends request for an endpoint using HTTP request (GET, POST, PUT, DELETE), we need to determine how the server will reponse by setting up the routes.
Let’s now create a a index.js file inside routes/ folder with content like this:
const post = require("../controllers/Post");
const express = require("express");
const router = express.Router();
// Create New Post
router.post("/api/posts/create", post.create);
// // Retrieve all posts
router.get("/api/posts/all", post.getAllPosts);
// Retrieve all Published posts
router.get("/api/posts/published", post.getAllPublishedPosts);
// Retrieve all Published posts by Publisher Name
router.get("/api/posts/publisher", post.getAllPostsByPublisherName);
// Retrieve all posts by title
router.get("/api/posts", post.getPostByTitle);
// Retrieve post by ID
router.get("/api/posts/:id", post.getPostByID);
// // Update post by ID
router.put("/api/post/update/:id", post.updatePostByID);
// // Delete post by ID
router.delete("/api/post/delete/:id", post.deletePostByID);
// Delete all posts
router.delete("/api/posts/deleteAll", post.deleteAllPosts);

module.exports = router;
You can see that we use a controller from ..controllers/Post.
We also need to include routes in server.js (right before app.listen()):
const api = require("./routes/index");

server.use("/", api);
After that update our server.js file must look like:
const express = require("express");
const bodyParser = require("body-parser");
const cors = require("cors");
const server = express();
const db = require("./models");
const corsSettings = {
  originL: "http://localhost:8081"
};

const api = require("./routes/index");
server.use(cors(corsSettings));
// Parse request of content-type - application/json
server.use(bodyParser.json());
// parse requests of content-type -application/x-www-form-urlencoded
server.use(bodyParser.urlencoded({ extended: true }));

server.use("/", api);
// set listening ports for request
const port = process.env.PORT || 80;

server.listen(port, () => {
  console.log(`Server running on port : ${port}`);
});
// Run following function if you want drop existing tables and re-sync database
// db.dropRestApiTable();
db.databaseConf.sync();
Note : In development, you may need to drop existing tables and re-sync database. So let’s create a new function on models/index.js to apply that.
Add following function on index.js
db.dropRestApiTable = () => {
  db.databaseConf.sync({ force: true }).then(() => {
    console.log("restTutorial table just dropped and db re-synced.");
  });
};
You can call that function on server.js file when you want drop existing table:
db.dropRestApiTable();
Test the APIs
Run our Node.js application with command: node server.js.
Server running on port : 80
Executing (default): CREATE TABLE IF NOT EXISTS restTutorials (id INTEGER NOT NULL auto_increment , title VARCHAR(255), description TEXT, published TINYINT(1), publisher VARCHAR(255), createdAt DATETIME NOT NULL, updatedAt DATETIME NOT NULL, PRIMARY KEY (id)) ENGINE=InnoDB;
Executing (default): SHOW INDEX FROM restTutorials
Using Postman, we’re gonna test all the Apis above.
1. Create a new posts using /api/posts/create Api
Below you can see a sample of our post request:
{
    "title": "JS Tutorials : Part 1",
    "description": "Node.js Rest APIs with Express, Sequelize & MySQL Part 1",
    "published": true,
    "publisher": "Christos Ploutarchou"
}
When we send post request if data stored on db we must get STATUS: 200 OK
Note: If you run MySQL using docker-compose you can access phpMyAdmin on localhost:8183 using following credentials username: root | password: pass
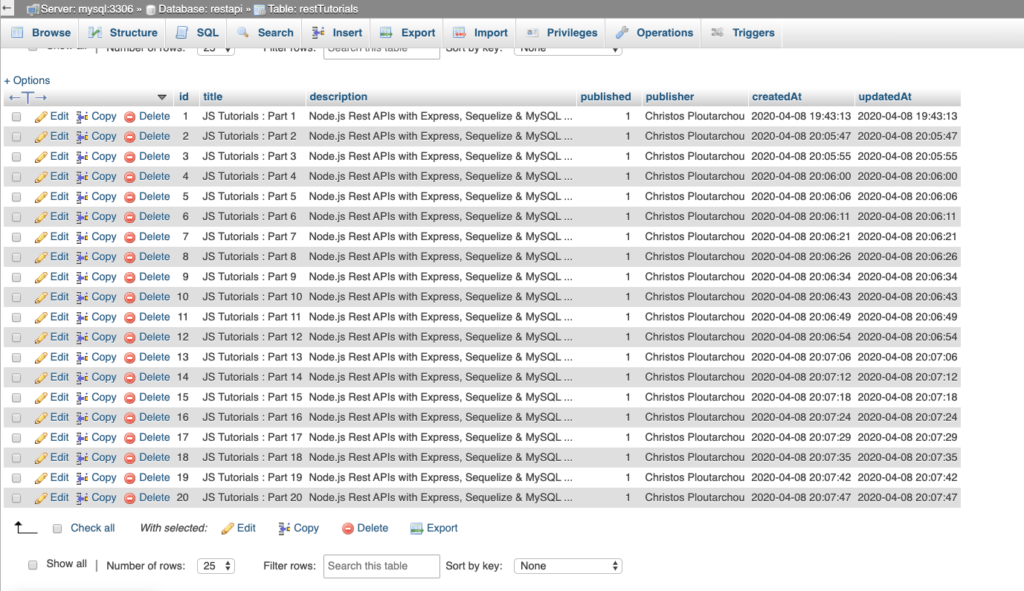
After creating some new Posts, you can check MySQL table by running following query on phpMyAdmin
select * from posts;
Your output must look something like image below:
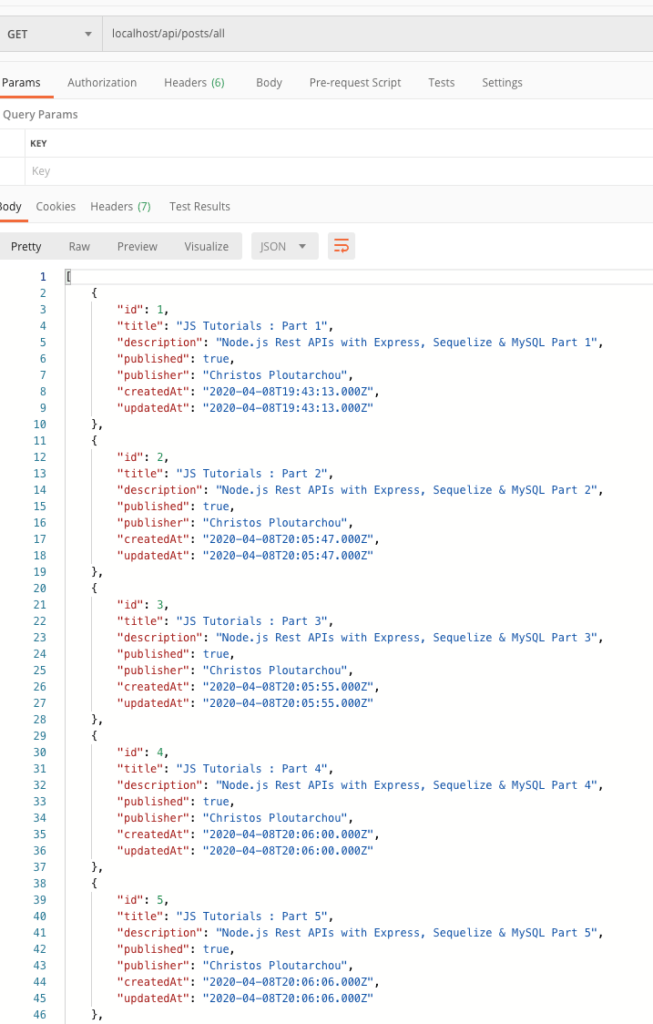
2 . Retrieve all Posts using GET /api/posts/all Api
You should get something like image below:
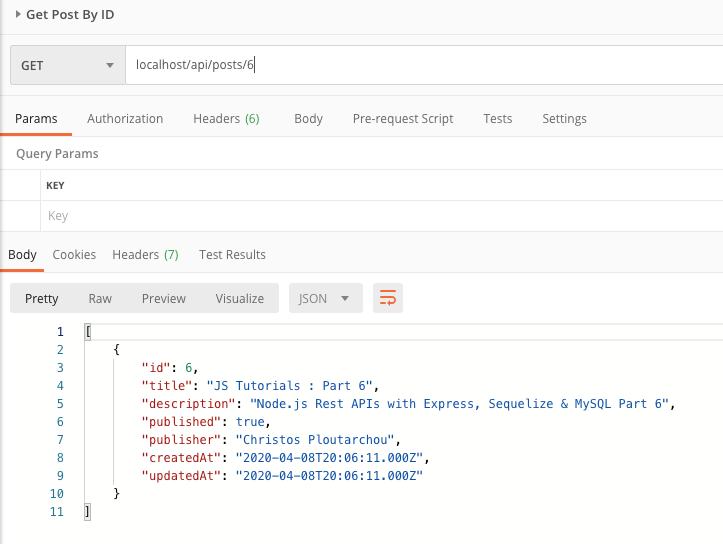
3 . Retrieve all Posts using GET /api/posts/:id Api
4 . Update a Post using PUT /api/post/update/:id Api

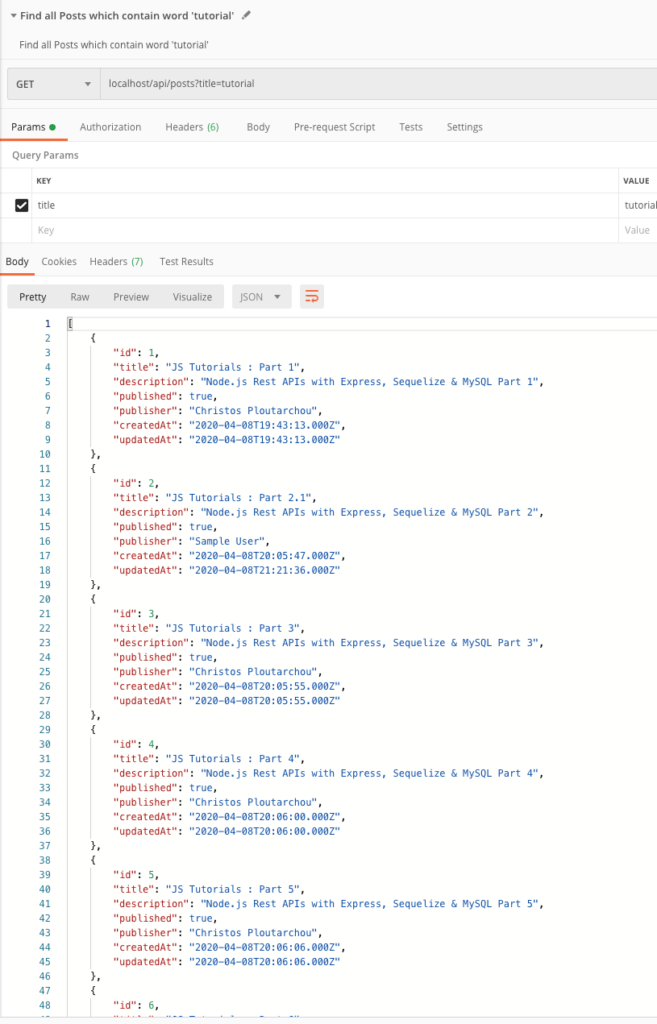
5 . Find all Posts which contain word ‘tutorials’ using GET /api/posts?title=tutorial Api
6 . Find all Posts by Publisher Name using GET /api/posts/publisher/?name=Christos Api

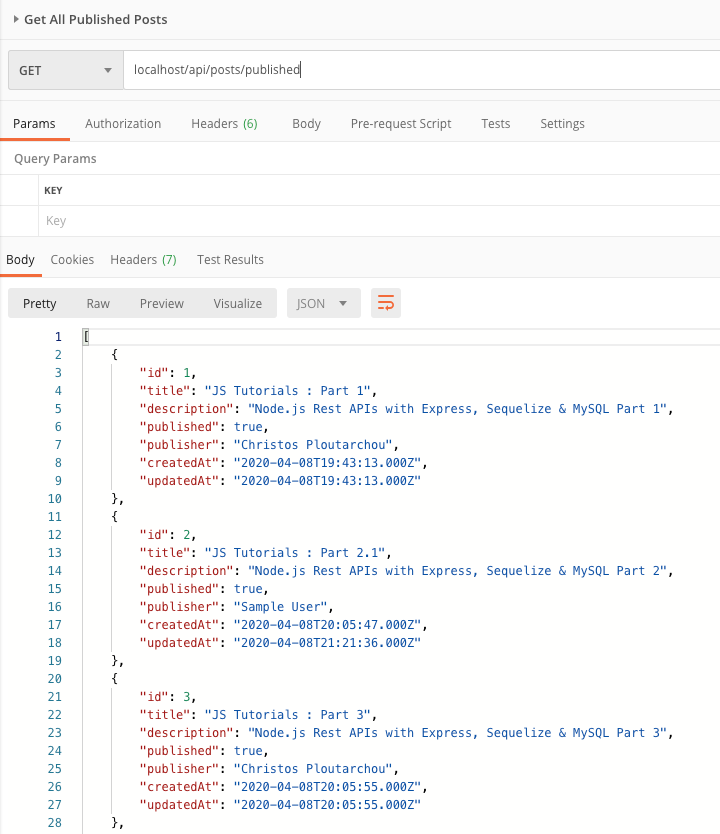
7. Find all published posts using GET /api/posts/published Api
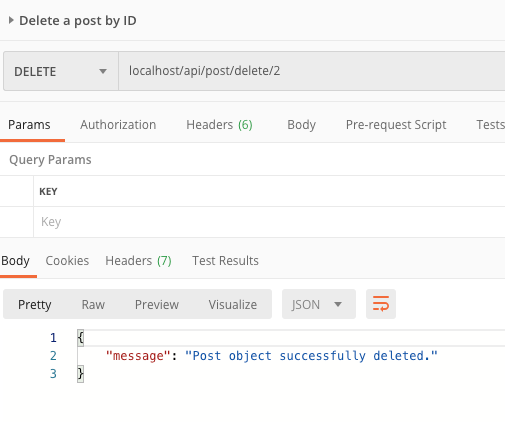
8. Delete a post using DELETE /api/posts/delete/:id Api
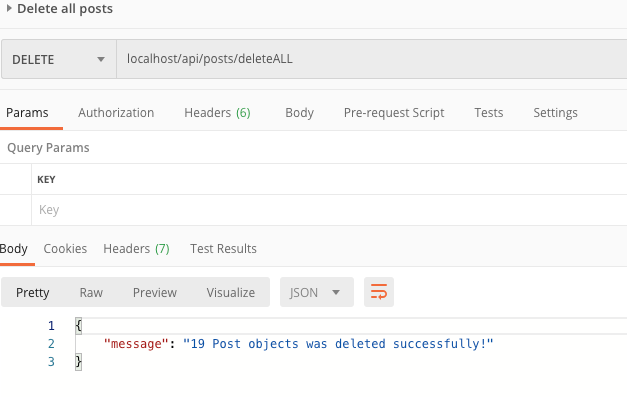
9. Delete all posts using DELETE /api/posts/deleteAll Api
You can download a complete copy of the project via my GitHub repository Click Here. (Please leave a star if you like my project)
