

Understanding *args and **kwargs in Python 3
Understanding *args
In Python, the single-asterisk form of args can be used as a parameter to send a non-keyworded variable-length argument list to functions. It is worth noting that the asterisk () is the critical element here, as the word args is the established conventional idiom, though the language does not enforce it.
Suppose we create a function to add two integer numbers like this.
def calculate_sum(a, b):
    return a + b
In the code above, we create the function with a and b as arguments, and then when we call the function, we pass two numbers to each argument…
In this case, we will pass number 5 in for a and the integer 6 in for b:
Output
if __name__ == '__main__':
    result = calculate_sum(a=5, b=6)
    print(f"The sum is {result}")

#output: The sum is 11
What is happen if, later on, we decide that we would like to sum the total of three numbers rather than just two? If we try to add a number to the function, as shown below, we’ll receive an error.
if __name__ == '__main__':
    result = calculate_sum(a=5, b=6 , c=8)
print(f"The sum is {result}")
#output : TypeError: calculate_sum() takes 2 positional arguments but 3 were given
So, if you suspect that you may need to use more arguments, later on, you can make use of *args as your parameter instead.
We can essentially create the same function and code that we showed in the first example by removing x and y as function parameters and instead of replacing them with *args as the example below.
def calculate_sum(*args):
    x = 0
    for num in args:
        x += num
    return x
Output
if __name__ == '__main__':
    result_1 = calculate_sum(5, 5, 5)
    result_2 = calculate_sum(5, 5, 5, 5)
    result_3 = calculate_sum(5, 5, 5, 5, 5)
    result_4 = calculate_sum(5, 5, 5, 5, 5, 5)

print(f"The sum is {result_1}")
#output : The sum is 15
print(f"The sum is {result_2}")
#output : The sum is 20
print(f"The sum is {result_3}")
#output : The sum is 25
print(f"The sum is {result_4}")
#output : The sum is 30
Because we used *args to pass a variable argument list to our function, we could pass in as many arguments as we want into the function calls.
With *args we can create more flexible code that accepts a varied amount of non-keyworded arguments within your function.
Understanding **kwargs
In the function below, there are four parameters defined. That is name, surname, score, and is_active. The function will print out each of these arguments.
def preset_args(name: str, surname: str, score: float, is_active: bool):
    print(f"The value of argument name is : {name}")
    print(f"The value of argument surname is : {surname}")
    print(f"The value of argument score is : {score}")
    print(f"The value of argument is_active is : {is_active}")
When we run the program with the python preset_args.py command, we’ll receive the following output:
if __name__ == '__main__':
    preset_args(name="Christos", surname="Ploutarchou", score=15, is_active=True)
#output : The value of argument name is : Christos
#output : The value of argument surname is : Ploutarchou
#output : The value of argument score is : 15
#output : The value of argument is_active is : True
The double asterisk in kwargs (**kwargs) is used to pass a keyworded variable argument to a function.
Like *args, **kwargs can take however many arguments you would like to supply to it. However, **kwargs differs from *args in that you will need to assign keywords to each value.
First, let’s print out the **kwargs arguments that we pass to a function.
def print_kwargs(**kwargs):
    for key, value in kwargs.items():
        print(f"The key: {key}, The value: {value}")
Let’s run the above function using two different ways and look at the output:
Example One (Pass argument in function)
def print_kwargs(**kwargs):
    for value in kwargs:
        print(value)
Now let’s run the function and set argument as default parameters of the function
if __name__ == '__main__':
    print_kwargs("Christos", "Ploutarchou", 15, True)
Output
Traceback (most recent call last):
  File "/home/christos/PycharmProjects/Tutorials/main.py", line 41, in <module>
    print_kwargs("Christos", "Ploutarchou", 15, True)
TypeError: print_kwargs() takes 0 positional arguments but 4 were given
By running function print_kwargs and pass only value, we get an exception. That happens because we use double asterisk notation (**), then it is required to pass key for each value we give in the function.
Example 2 (Pass keyworded variable arguments)
if __name__ == '__main__':
    print_kwargs(name="Christos", surname="Ploutarchou", score=15, is_active=True)

#output: The value of the argument name is: Christos
#output: The value of argument surname is: Ploutarchou
#output: The value of the argument score is: 15
#output: The value of argument is_active is: True
The function successfully executed without any exception by running function print_kwargs and passing the arguments by set key for each value.
Important Note: The most important thing here is double asterisk notation (**). We can name our kwargs to any value we want, for example, def print_kwargs(**required_arquments).
Conclusion
We can use the particular syntax of *args and **kwargs within a function definition to pass a variable number of arguments to the function.
Creating functions that accept *args and **kwargs are best used in situations where you expect that the number of inputs within the argument list will remain relatively small. The use of *args and **kwargs is primarily to provide readability and convenience but should be done with care.

Stop Using Square Brackets to Get a python Dictionary Values
A python dictionary is an unordered set of keys and values.
That means :
- Each data point has an identifier (key) and a value.
- The keys must be unique to that dictionary — no repetitions.
- The keys have no explicit order — unlike a list.
To define a dictionary, use curly braces and separate each term/definition pair with a comma.
Example
author = {
   "first_name": "Christos",
   "last_name": "Ploutarchou",
   "username": "christos_ploutarchou"
}
The traditional way to get a Dictionary Value
The traditional way to get a value from a dictionary is to use square bracket notation. This syntax nests the name of the key within square brackets, as seen below.
author = {
   "first_name": "Christos",
   "last_name": "Ploutarchou",
   "username": "christos_ploutarchou"
}
print(author['username'])
#output : christos_ploutarchou
print(author['surname'])
#output : KeyError: 'surname'
Notice how trying to reference a term that doesn’t exist causes a KeyError.
These causes cause significant headaches, especially when dealing with unpredictable business data.
While we could wrap our statement in a try/except or if statement, this much care for a dictionary term will quickly heap up.
Example
author = {}
try:
   print(author['username'])
except KeyError as e:
   print(e) # 'username'
if 'username' in author:
   print(author['username'])
If you come from another programming language like JavaScript, you may be tempted to reference a dictionary value using dot notation. That doesn’t work in Python.
author = {
   "first_name": "Christos",
   "last_name": "Ploutarchou",
   "username": "christos_ploutarchou"
}
print(author.username)
# AttributeError: 'dict' object has no attribute 'username'
Start using the .get() Method
When you want to access a dictionary’s value, the safest way to do so is by using the .get() method. This method has two parameters:
- First (required): the name of the term to be retrieved. This can be a String or a variable, allowing for dynamic term retrieval.
- Second (optional): the value to be used as a default if the term doesn’t exist.
Example
author = {
   "first_name": "Christos",
   "last_name": "Ploutarchou",
   "username": "christos_ploutarchou"
}
print(author.get('username'))
#output : christos_ploutarchou
print(author.get('middle_initial', None))
#output : None
When the term has previously been declared, .get() works no differently than a traditional square bracket reference. If the key isn’t defined, a default value is returned that saves you from handling an exception.
This default value can be anything you want, but remember that it’s optional. When no default value is set, the get() method returns None if the key does not exists.
Start using the .setdefault() Method
Sometimes, not only do you want to protect from an undefined key in your dictionary, but you also want your code to self-correct its data structures. The .setdefault() is structured identically to .get(). However, when the key is undefined and returning a default value, it will set the dictionary’s key the default value.
Example
author = {
   "first_name": "Christos",
   "last_name": "Ploutarchou",
   "username": "christos_ploutarchou"
}
print(author.setdefault('username'))
#output : christos_ploutarchou
print(author.setdefault('middle_initial', None))
#output : None
In the above example, we see that .setdefault() is the same as square bracket notation or .get() when the key exists.
Additionally, it behaves the same as .get() when the term doesn’t exist, returning the passed default value.
It differs from .get() because the term and definition are now part of the dictionary, as we see below.
author = {
   "first_name": "Christos",
   "last_name": "Ploutarchou",
   "username": "christos_ploutarchou"
}
print(author.setdefault('surname',None))
#output : None
print(author)
# output
{
   "first_name": "Christos",
   "last_name": "Ploutarchou",
   "username": "christos_ploutarchou",
   "surname": None

}
"""Both.get()and.setdefault()are superior techniques when referencing dictionary values. When you don’t want to alter the original data,.get()is your choise. When you want to alter the original data, then just use.setdefault().

Mastering check data types in Javascript
This article will help you to check data types in Javascript whether a variable or parameter is a string, number, array, object, function, null & undefined, boolean, regexp, error or date.
Table of contents
- How do you check if a variable is a String in Javascript
- How do you check if a variable is a Number in Javascript
- How do you check if a variable is an Array in Javascript
- How do you check if a variable is a Function in Javascript
- How do you check if a variable is an Object in Javascript
- How do you check if a variable is a Null & undefined in Javascript
- How do you check if a variable is a Boolean in Javascript
- How do you check if a variable is a RegExp in Javascript
- How do you check if a variable is an Error in Javascript
- How do you check if a variable is a Date in Javascript
- How do you check if a variable is a Symbol in Javascript
How do you check if a variable is a String in Javascript
A string is always a string so this one is easy. Except if called with new (new String) type of will instead return “object”. So to also include those strings instance of can be used.
function isString (value) {
    return typeof value === 'string' || value instanceof String;
}
How do you check if a variable is a Number in Javascript
From type-of more things than just an ordinary number will return “number” like NaN and Infinity. To know if a value really is a number the function isFinite is also required.
function isNumber (value) {
    return typeof value === 'number' && isFinite(value);
}
How do you check if a variable is a Array in Javascript
In JavaScript arrays are not true arrays
In javascript arrays are not true arrays like in java and in other languages. They’re actually objects so typeof will return “object” for them. To know if something’s really an array its constructor can be compared to Array.
function isArray (value) {
return value && typeof value === 'object' && value.constructor === Array;
}

// ES5 actually has a method for this (ie9+)
Array.isArray(value);
How do you check if a variable is a Function in Javascript
Functions are functions so here just typeof is enough.
function isFunction (value) {
    return typeof value === 'function';
}
How do you check if a variable is an Object in Javascript
Many things are objects in javascript. To know if a value is an object that can have properties and be looped through, its constructor can be compared to Object. It doesn’t work for objects created from classes, then the instance of the operator can be used instead.
function isObject (value) {
return value && typeof value === 'object' && value.constructor === Object;
}
How do you check if a variable is a Null & undefined in Javascript
Most times you don’t need to check explicitly for null and undefined since they’re both falsy values. However to do it below functions does the trick.
// Returns if a value is null
function isNull (value) {
    return value === null;
}

// Returns if a value is undefined
function isUndefined (value) {
    return typeof value === 'undefined';
}
How do you check if a variable is a Boolean in Javascript
For booleans typeof is enough since it returns “boolean” for both true and false.
// Returns if a value is a boolean
function isBoolean (value) {
    return typeof value === 'boolean';
}
How do you check if a variable is a RegExp in Javascript
Regexps are objects so the only thing needed to check is if the constructor is Regexp.
// Returns if a value is a regexp
function isRegExp (value) {
    return value && typeof value === 'object' && value.constructor === RegExp;
}
How do you check if a variable is an Error in Javascript
Errors in javascript are the same as “exceptions” in many other programming languages. They come in a couple of different forms like for instance Error, TypeError, and RangeError. An instanceof statement is enough for them all, but just to be extra sure we also check for the “message” property that errors have.
// Returns if value is an error object
function isError (value) {
return value instanceof Error && typeof value.message !== 'undefined';
}
How do you check if a variable is a Date in Javascript
Date isn’t really a data type in Javascript. But to know if something’s a Date object it can be checked with instanceof.
// Returns if value is a date object
function isDate (value) {
    return value instanceof Date;
}
How do you check if a variable is a Symbol in Javascript
In ES6 the new datatype Symbol was added. Nicely enough typeof returns “symbol” for it so no more logic is required.
// Returns if a Symbol
function isSymbol (value) {
return typeof value === 'symbol';
}
Best Way To Validate Email In Javascript
Javascript is one of the most trending programming language these days. Be it frontend development or backend development, Javascript used widely in almost every field of web development.
While the development of any websites or applications using the Javascript, we have to create a contact form, signup form, sign in form, or any other type of forms where we need users’ email.
It is very important to validate the input fields before doing any further action on this. And email validation is a must to do thing in any type of form building.
Here, we are not going to debate about what is the email and which one is a valid or invalid email.
So without wasting any further time, let’s see how to validate email in Javascript.
Different Methods To validate Email In Javascript
There are many ways to validate the email depending upon the requirement.
- Using the regex expression
- Using any third party library
- Using HTML in-built email validation property
Here, we are going to use the simple regex expression for validating the email.
Rules That Email Validation Should Follow
Before writing the regex, we first know what is the basic rule that email validation should follow?
Mainly an email address consists of two-part, local part and domain part.
The local-part contains the following thing
- any alphanumeric character: a-zA-Z0-9
- a dot ((.), if it’s not the first or last character
- punctuation: “(),:;<>@[\]
- special characters: !#$%&’*+-/=?^_{|}~
And the domain part contains the following
- any alphanumeric character: a-zA-Z0-9
- the hyphen (-), if it’s not the first or last character. It can be repeated
Regular Expression To Validate Email In Javascript
There is no universal regular expression to validate email, Everyone is using a different set of regex in their code to validate the email.
Before using any regex in your code, you first validate it by trying on so some valid and invalid email address.
/^(([^<>()\[\]\\.,;:\s@"]+(\.[^<>()\[\]\\.,;:\s@"]+)*)|(".+"))@((\[[0-9]{1,3}\.[0-9]{1,3}\.[0-9]{1,3}\.[0-9]{1,3}\])|(([a-zA-Z\-0-9]+\.)+[a-zA-Z]{2,}))$/Above is the regex which can validate the 99.9% of the email address.
I know, it is not the simple regex to understand. Some regex expert writes this and it spread all over the internet now.
You can check this regex by trying any online regular expression testing tool. For my testing, I prefer to use regexr website.
Javascript Code To Validate Email
const validateEmail = (email)  => {
    const re = /^(([^<>()\[\]\\.,;:\s@"]+(\.[^<>()\[\]\\.,;:\s@"]+)*)|(".+"))@((\[[0-9]{1,3}\.[0-9]{1,3}\.[0-9]{1,3}\.[0-9]{1,3}\])|(([a-zA-Z\-0-9]+\.)+[a-zA-Z]{2,}))$/;
    return re.test(email.toLowerCase());
}
Above is the simple javascript arrow function which is used to validate any email. Code is very simple to understand, here we use the regular expression to compare it with the provided email id after converting it into the lowercase.
Conclusion
This is all above the validation email in javascript using the regex. Although the regex which is used in this article is not easy to understand in the first go.
Note : If you have any doubts or suggestion then do comment in the comment box and if you like this article then share it.
How To Build Simple Node.js Rest APIs with Express, Sequelize & MySQL
We’ll be start to build a Node.js Rest API with Express, Sequelize & MySQL. Here we’ll use Sequelize for interacting with the MySQL instance.
Required applications
- Docker is a set of platform as a service product that uses OS-level virtualization to deliver software in packages called containers. Containers are isolated from one another and bundle their own software, libraries and configuration files; they can communicate with each other through well-defined channels.
- Node.js is a platform built on Chrome’s JavaScript runtime for easily building fast and scalable network applications. Node.js is an open-source, cross-platform runtime environment for developing server-side and networking applications.
- ExpressJS is one of the most popular web frameworks for node.js. It is built on top of node.js HTTP module and adds support for routing, middleware, view system, etc. It is very simple and minimal, unlike other frameworks that try to do way too much, thereby reducing the flexibility for developers to have their own design choices.
- Sequelize is a promise-based Node.js ORM for Postgres, MySQL, MariaDB, SQLite, and Microsoft SQL Server. It features solid transaction support, relations, eager and lazy loading, read replication and more.
- CORS is a node.js package for providing a Connect/Express middleware that can be used to enable CORS with various options
- body-parser Parse incoming request bodies in a middleware before your handlers, available under the
req.bodyproperty. - Postman is an API(application programming interface) development tool that helps to build, test and modify APIs.It has the ability to make various types of HTTP requests(GET, POST, PUT, PATCH, etc.).
Node.js Rest CRUD API overview
We will build Rest Apis that can create, retrieve, update, delete and find posts by title.
First, we start with an Express web server. Next, we add configuration for MySQL database, create Post a model with Sequelize, write the controller. Then we define routes for handling all CRUD operations (including custom finder).
The following table shows overview of the Rest APIs that will be exported
| Methods | Urls | Actions |
|---|---|---|
| GET | api/posts/all | Get all Posts |
| GET | api/posts/:id | Get post by id |
| POST | api/posts/create | Create a new post |
| PUT | api/posts/update/:id | Update post by id |
| DELETE | api/posts/delete/:id | Delete post by id |
| DELETE | api/posts/deletealls | Delete all posts |
| GET | api/posts/published | Get all published posts |
| GET | api/posts?title=’test’ | Get all posts which title contains 'test' |
| GET | api/posts/publisher?name=christos | Get All posts where publisher name is 'christos' |
This is our project structure:

Now let’s start Creating Node.js App
First, we create a folder:
$ mkdir node_rest_api_with_mysql
$ cd node_rest_api_with_mysql
Next, we initialise the Node.js App with a package.json file:
npm init

name: (nodejs-express-sequelize-mysql)
version: (1.0.0)
description: Node.js Rest Apis with Express, Sequelize & MySQL.
entry point: (index.js) server.js
test command:
git repository:
keywords: nodejs, express, sequelize, mysql, rest, api, docker
author: Christos Ploutarchou
license: (ISC)

Is this ok? (yes) yes
If your already have MySQL installed on you PC you can ignore following Steps
Next, need to install docker for mysql and phpMyAdmin.
- Install Docker (Learn more about docker installation here)
- Enter on the project root directory
- Up the compose
docker-compose up -d
- Access phpmyadmin
your_ip:8183
Server: mysql
Username: root/root
Password: root/pass
- Access mysql on terminal
docker exec -it mysql_container_name mysql -u root -p
Docker phpmyadmin ENV
| PMA_ARBITRARY | when set to 1 connection to the arbitrary server will be allowed |
| PPMA_HOST | define address/host name of the MySQL server |
| PMA_PORT | define port of the MySQL server |
- If you need more information about phpmyadmin image. READ HERE
- If you need more information about mysql image. READ HERE
We need also to install necessary modules: express, sequelize, mysql2 and body-parser on our project.
Run the command:
npm install express body-parser cors sequelize mysql2 --save
When installation finish package.json file should look like this:
{
  "name": "node_rest_api_with_mysql",
  "version": "1.0.0",
  "description": "Node.js Rest Api with Express, Sequelize, MySQL & phpMyAdmin .",
  "main": "server.js",
  "scripts": {
    "start": "nodemon server.js"
  },
  "repository": {
    "type": "git",
    "url": "git+https://github.com/cploutarchou/node_rest_api_with_mysql.git"
  },
  "keywords": [
    "node",
    "rest-api",
    "tutorial",
    "mysql",
    "phpMyAdmin",
    "docker",
    "node.js",
    "sequilize"
  ],
  "author": "Christos Ploutarchou",
  "license": "ISC",
  "bugs": {
    "url": "https://github.com/cploutarchou/node_rest_api_with_mysql/issues"
  },
  "homepage": "https://github.com/cploutarchou/node_rest_api_with_mysql#readme",
  "dependencies": {
    "body-parser": "^1.19.0",
    "cors": "^2.8.5",
    "express": "^4.17.1",
    "mysql2": "^2.1.0",
    "sequelize": "^5.21.5"
  },
  "devDependencies": {
    "nodemon": "^2.0.2"
  }
}
Setup Express web server
In our root directory need to create a new server.js file:
const express = require("express");
const bodyParser = require("body-parser");
const cors = require("cors");
const server = express();
const db = require("./models");
const corsSettings = {
  originL: "http://localhost:8081"
};

const api = require("./routes/index");
server.use(cors(corsSettings));

// Parse request of content-type - application/json
server.use(bodyParser.json());

// parse requests of content-type -application/x-www-form-urlencoded
server.use(bodyParser.urlencoded({ extended: true }));

create a simple route
server.get("/", (_req, res) => {
   res.json({ message: "Welcome to node.js rest api application. Created for learning purposes by Christos Ploutarchou" });
});

// set listening ports for request
const port = process.env.PORT || 8080;

server.listen(port, () => {
  console.log("Server running on port : " + port );
});
What we are doing here:
– import express, body-parser and cors modules:
- Express is for building the Rest apis.
- body-parser helps to parse the request and create the
req.bodyobject. - cors provides Express middleware to enable CORS with various options.
– create an Express app, then add body-parser and cors middlewares using app.use() method. Notice that we set origin: http://localhost:8081.
– define a GET route which is simple for test.
– listen on port 8080 for incoming requests.
Now let’s run the app by running the following command : node server.js.
Open your browser with URL http://localhost:8080/, you will see:
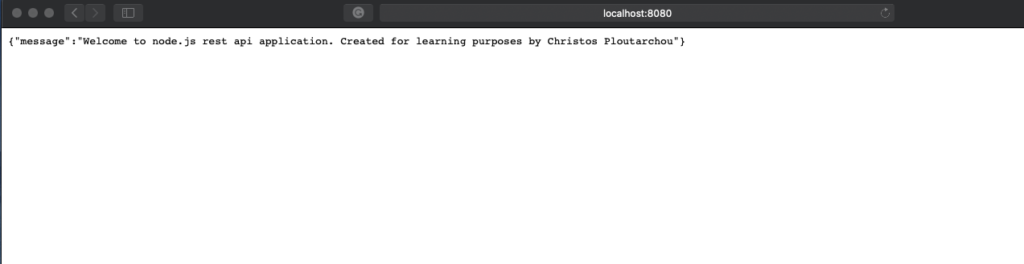
Yes Correct, the first step is done. We’re gonna work with Sequelize in the next section.
Configure MySQL database & Sequelize
In the root folder, we create a separate config folder for configuration with db.config.js file like this:
Note: If you don’t user project docker compose, Then need to update database info with your local environment credentials and info.
module.exports = {
  HOST: "localhost",
  USER: "root",
  PASSWORD: "pass",
  DB: "restapi",
  dialect: "mysql",
  pool: {
    max: 10,
    min: 0,
    acquire: 30000,
    idle: 50000
  }
};
The first five parameters are for MySQL connection.pool is optional, it will be used for Sequelize connection pool configuration:
max: maximum number of connection in poolmin: minimum number of connection in poolidle: maximum time, in milliseconds, that a connection can be idle before being releasedacquire: maximum time, in milliseconds, that pool will try to get connection before throwing error
For more information, you can visit API Reference for the Sequelize constructor.
Initialize Sequelize
We’re gonna initialise Sequelize in app/models folder that will contain model in the next step.
Now create app/models/index.js with the following code:
const dbConfig = require("../config/db.config");
const Sequelize = require("sequelize");
const database = new Sequelize(dbConfig.DB, dbConfig.USER, dbConfig.PASSWORD, {
  host: dbConfig.HOST,
  dialect: dbConfig.dialect,
  operatorsAliases: false,
  pool: {
    max: dbConfig.pool.max,
    min: dbConfig.pool.min,
    acquire: dbConfig.pool.acquire,
    idle: dbConfig.pool.idle
  }
});

const db = {};
db.Sequelize = Sequelize;
db.databaseConf = database;
db.posts = require("./Sequelize.model")(database, Sequelize);
module.exports = db;
Don’t forget to call sync() method in server.js:
const db = require("./models");
db.databaseConf.sync();
After that your server.js file must look like below:
const express = require("express");
const bodyParser = require("body-parser");
const cors = require("cors");
const server = express();
const db = require("./models");
const corsSettings = {
  originL: "http://localhost:8081"
};

const api = require("./routes/index");
server.use(cors(corsSettings));

// Parse request of content-type - application/json
server.use(bodyParser.json());

// parse requests of content-type -application/x-www-form-urlencoded
server.use(bodyParser.urlencoded({ extended: true }));

create a simple route
server.get("/", (_req, res) => {
   res.json({ message: "Welcome to node.js rest api application. Created for learning purposes by Christos Ploutarchou" });
});

// set listening ports for request
const port = process.env.PORT || 8080;

server.listen(port, () => {
  console.log("Server running on port : " + port );
});
db.databaseConf.sync();
Define the Sequelize Model
In models folder, create Sequelize.model.js file like this:
module.exports = (database, Sequelize) => {
  return database.define("restTutorial", {
    title: {
      type: Sequelize.STRING
    },
    description: {
      type: Sequelize.TEXT
    },
    published: {
      type: Sequelize.BOOLEAN
    },
    publisher: {
      type: Sequelize.STRING
    }
  });
};
This Sequelize Model represents restTutorials table in MySQL database. These columns will be generated automatically: id, title, description, published, createdAt, updatedAt.
After initializing Sequelize, we don’t need to write CRUD functions, Sequelize supports all of them:
- Create a new post :
create(object) - Get all posts:
findAll() - Update a post by id:
update(data, where: { id: id }) - Delete a post :
destroy(where: { id: id }) - Delete all posts:
destroy(where: {}) - Get all post by title:
findAll({ where: { title: ... } }) - Get all post by publisher name:
findAll({ where: { publisher: ... } })
These functions will be use it on our Controller.
Create the Controller
Inside app/controllers folder, let’s create Post.js with these CRUD functions:
- create
- findAll
- findOne
- update
- delete
- deleteAll
- findAllPublished
- findByPublisherName
const db = require('../models')
const postObj = db.posts
const Op = db.Sequelize.Op

// Create and save new Post
exports.create = (request, result) => {
}

// Save Post object to db
postObj.create(post).then(data => {

}

// Retrieve all Post (Receive data with condition).
exports.getAllPosts = (request, result) => {

}

// Get Post object by ID
exports.getPostByID = (request, result) => {

}
// Update a Post object by the id
exports.updatePostByID = (request, result) => {

}

// Delete Post object by ID
exports.deletePostByID = (request, result) => {

}

// Delete All Posts objects from database
exports.deleteAllPosts = (request, result) => {

}

// Get all published Post
exports.getAllPublishedPosts = (request, result) => {

}

// Get all published Post by Publisher Name
exports.getAllPostsByPublisherName = (request, result) => {

}

// Get all published post by Title
exports.getPostByTitle = (request, result) => {

}
Now Let’s implement these functions.
Create a new post object
// Create and save new Post
exports.create = (request, result) => {
  if (!request.body.title) {
    result.status(400).send({
      message: "Content cannot be empty"
    });
  }

  // Create a Post object
  const post = {
    title: request.body.title,
    description: request.body.description,
    published: request.body.published ? request.body.published : false,
    publisher: request.body.publisher ? request.body.publisher : false
  };

  // Save Post object to db
  postObj.create(post).then(data => {
    result.send(data);
  }).catch(err => {
    result.status(500).send({
      message: err.message || "Some error occurred while saving."
    });
  });
};
Get all objects (By post title)
// Get all published post by Title
exports.getPostByTitle = (request, result) => {
  const title = request.query.title;
  postObj.findAll({
    where: {
      publisher: { [Op.like]: `%${title}%` },
      published: true
    }
  }).then(data => {
    result.send(data);
  }).catch(err => {
    result.status(500).send({
      message: err.message || "Something going wrong. Unable to retrieve data!"
    });
  });
};
On that function we use request.query.title to get query string from the Request and consider it as condition for findAll() method.
Get single post object (By post ID)
// Get Post object by ID
exports.getPostByID = (request, result) => {
  const paramID = request.params.id;
  console.log(paramID);
  console.log(paramID);
  postObj.findAll({
    where: { id: paramID }
  }).then(data => {
    result.send(data);
  }).catch(err => {
    result.status(500).send({
      message: err.message || `Some error occurred while retrieving data with id : ${paramID}`
    });
  });
};
Update a Post object by the id
// Update a Post object by the id
exports.updatePostByID = (request, result) => {
  const id = request.params.id;
  postObj.update(request.body, {
    where: { id: id }
  }).then(num => {
    if (num === 1) {
      result.send({
        message: "Post object successfully updated."
      });
    } else {
      result.send({
        message: `Cannot update Post object with id=${id}!`
      });
    }
  }).catch(err => {
    result.status(500).send({
      message: err.message || `Error while updating Post object with id=${id}!`
    });
  });
};
Delete Post object by ID
// Delete Post object by ID
exports.deletePostByID = (request, result) => {
  const id = request.params.id;
  postObj.destroy({
    where: { id: id }
  }).then(num => {
    if (num === 1) {
      result.send({
        message: "Post object successfully deleted."
      });
    } else {
      result.send({
        message: `Cannot delete Post object with id=${id}!`
      });
    }
  }).catch(err => {
    result.status(500).send({
      message: err.message || `Cannot delete Post object with id=${id}!`
    });
  });
};
Delete All Posts objects from database
// Delete All Posts objects from database
exports.deleteAllPosts = (request, result) => {
  postObj.destroy({
    where: {},
    truncate: false
  }).then(nums => {
    result.send({
      message: `${nums} Post objects was deleted successfully!`
    });
  }).catch(err => {
    result.status(500).send({
      message: err.message || "Cannot delete Post objects. Something going wrong}!"
    });
  });
};
Get all published Posts objects from database
// Get all published Post
exports.getAllPublishedPosts = (request, result) => {
  postObj.findAll({
    where: { published: true }
  }).then(data => {
    result.send(data);
  }).catch(err => {
    result.status(500).send({
      message: err.message || "Something going wrong. Unable to retrieve data!"
    });
  });
};
Get all published Posts objects from database
exports.getAllPosts = (request, result) => {
  postObj.findAll()
    .then(data => {
      result.send(data);
    }).catch(err => {
      result.status(500).send({
        message: err.message || "Some error occurred while retrieving data."
      });
    });
};
Get all Posts by Publisher Name
// Get all published Post by Publisher Name
exports.getAllPostsByPublisherName = (request, result) => {
  const name = request.params.name;
  const condition = name ? { publisher: { [Op.like]: `%${name}%` } } : null;
  postObj.findAll({ where: condition }).then(data => {
    result.send(data);
  }).catch(err => {
    result.status(500).send({
      message: err.message || "Something going wrong. Unable to retrieve data!"
    });
  });
};
Define Routes
When a client sends request for an endpoint using HTTP request (GET, POST, PUT, DELETE), we need to determine how the server will reponse by setting up the routes.
Let’s now create a a index.js file inside routes/ folder with content like this:
const post = require("../controllers/Post");
const express = require("express");
const router = express.Router();
// Create New Post
router.post("/api/posts/create", post.create);
// // Retrieve all posts
router.get("/api/posts/all", post.getAllPosts);
// Retrieve all Published posts
router.get("/api/posts/published", post.getAllPublishedPosts);
// Retrieve all Published posts by Publisher Name
router.get("/api/posts/publisher", post.getAllPostsByPublisherName);
// Retrieve all posts by title
router.get("/api/posts", post.getPostByTitle);
// Retrieve post by ID
router.get("/api/posts/:id", post.getPostByID);
// // Update post by ID
router.put("/api/post/update/:id", post.updatePostByID);
// // Delete post by ID
router.delete("/api/post/delete/:id", post.deletePostByID);
// Delete all posts
router.delete("/api/posts/deleteAll", post.deleteAllPosts);

module.exports = router;
You can see that we use a controller from ..controllers/Post.
We also need to include routes in server.js (right before app.listen()):
const api = require("./routes/index");

server.use("/", api);
After that update our server.js file must look like:
const express = require("express");
const bodyParser = require("body-parser");
const cors = require("cors");
const server = express();
const db = require("./models");
const corsSettings = {
  originL: "http://localhost:8081"
};

const api = require("./routes/index");
server.use(cors(corsSettings));
// Parse request of content-type - application/json
server.use(bodyParser.json());
// parse requests of content-type -application/x-www-form-urlencoded
server.use(bodyParser.urlencoded({ extended: true }));

server.use("/", api);
// set listening ports for request
const port = process.env.PORT || 80;

server.listen(port, () => {
  console.log(`Server running on port : ${port}`);
});
// Run following function if you want drop existing tables and re-sync database
// db.dropRestApiTable();
db.databaseConf.sync();
Note : In development, you may need to drop existing tables and re-sync database. So let’s create a new function on models/index.js to apply that.
Add following function on index.js
db.dropRestApiTable = () => {
  db.databaseConf.sync({ force: true }).then(() => {
    console.log("restTutorial table just dropped and db re-synced.");
  });
};
You can call that function on server.js file when you want drop existing table:
db.dropRestApiTable();
Test the APIs
Run our Node.js application with command: node server.js.
Server running on port : 80
Executing (default): CREATE TABLE IF NOT EXISTS restTutorials (id INTEGER NOT NULL auto_increment , title VARCHAR(255), description TEXT, published TINYINT(1), publisher VARCHAR(255), createdAt DATETIME NOT NULL, updatedAt DATETIME NOT NULL, PRIMARY KEY (id)) ENGINE=InnoDB;
Executing (default): SHOW INDEX FROM restTutorials
Using Postman, we’re gonna test all the Apis above.
1. Create a new posts using /api/posts/create Api
Below you can see a sample of our post request:
{
    "title": "JS Tutorials : Part 1",
    "description": "Node.js Rest APIs with Express, Sequelize & MySQL Part 1",
    "published": true,
    "publisher": "Christos Ploutarchou"
}
When we send post request if data stored on db we must get STATUS: 200 OK
Note: If you run MySQL using docker-compose you can access phpMyAdmin on localhost:8183 using following credentials username: root | password: pass
After creating some new Posts, you can check MySQL table by running following query on phpMyAdmin
select * from posts;
Your output must look something like image below:

2 . Retrieve all Posts using GET /api/posts/all Api
You should get something like image below:

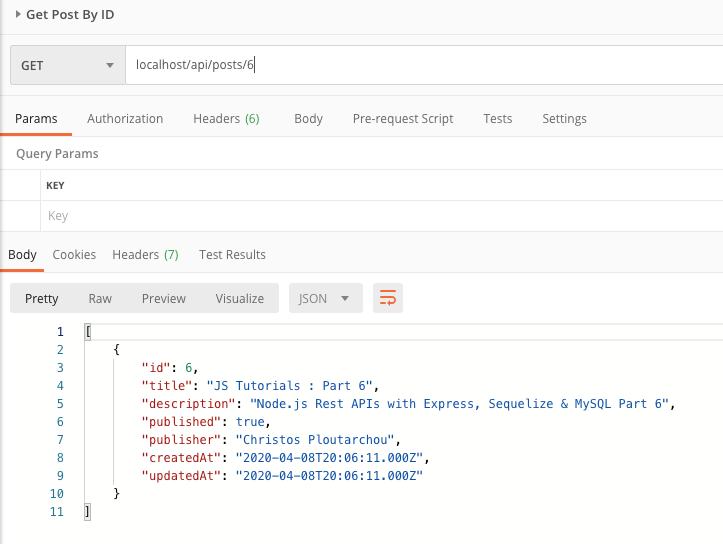
3 . Retrieve all Posts using GET /api/posts/:id Api
4 . Update a Post using PUT /api/post/update/:id Api

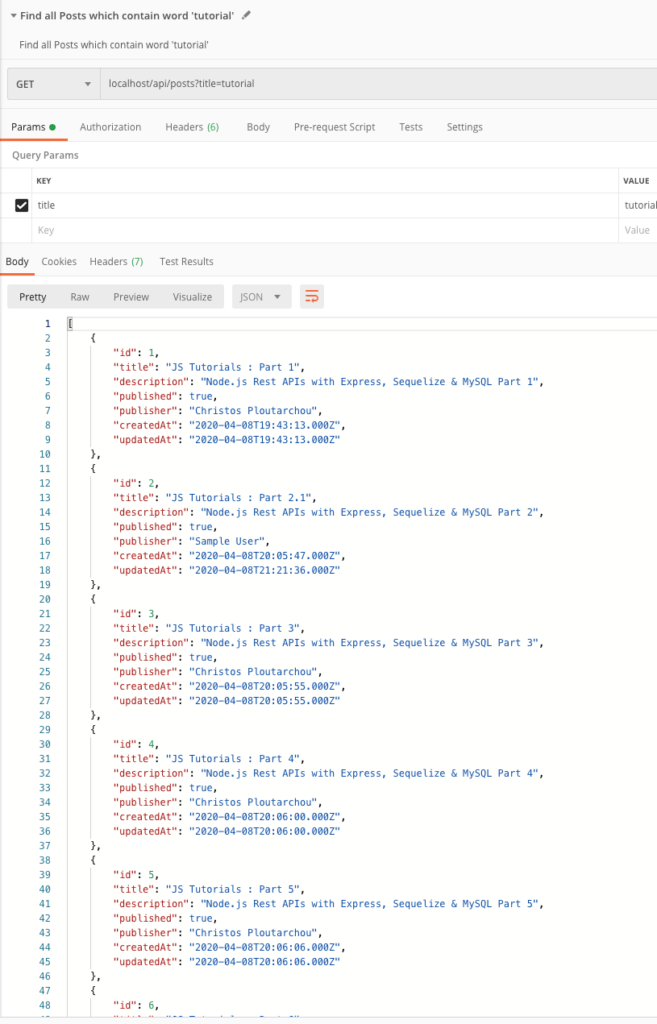
5 . Find all Posts which contain word ‘tutorials’ using GET /api/posts?title=tutorial Api
6 . Find all Posts by Publisher Name using GET /api/posts/publisher/?name=Christos Api

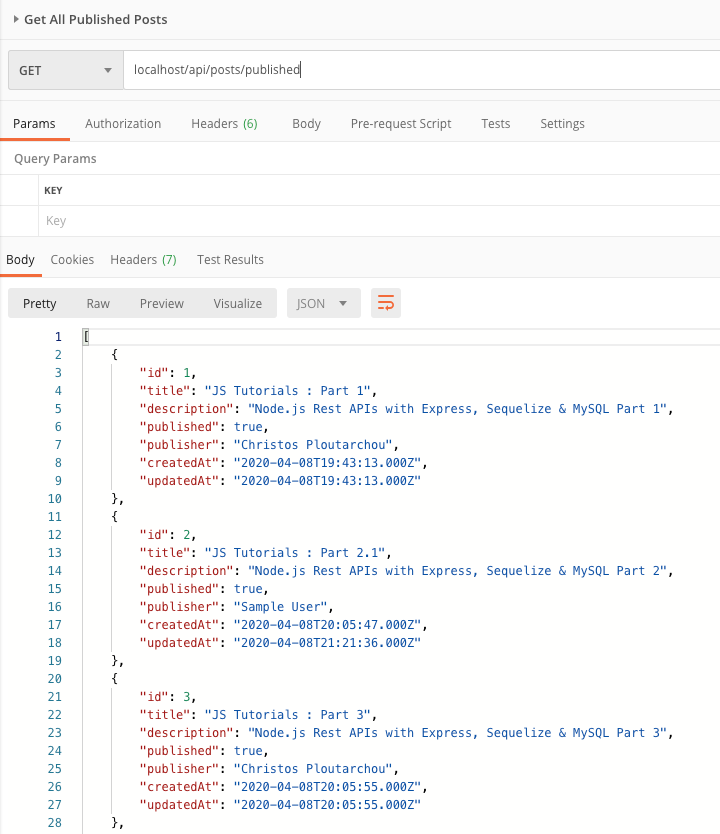
7. Find all published posts using GET /api/posts/published Api
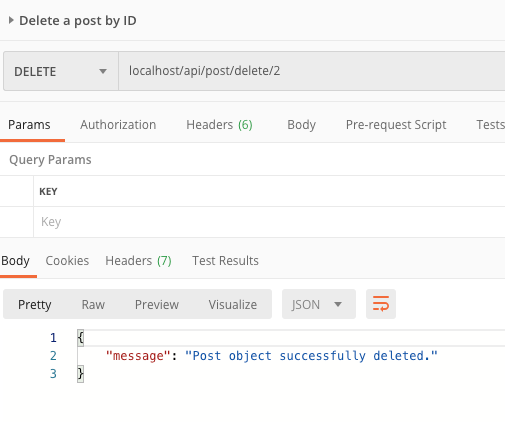
8. Delete a post using DELETE /api/posts/delete/:id Api
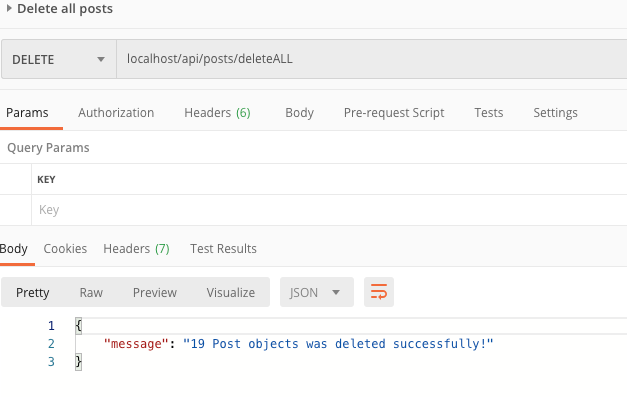
9. Delete all posts using DELETE /api/posts/deleteAll Api
You can download a complete copy of the project via my GitHub repository Click Here. (Please leave a star if you like my project)

How to iterate over Javascript object properties
Here some very common tasks how to iterating over an JavaScript object properties
If you have an object, you can’t just iterate it using map(), forEach() or a for..of loop.
You will get the following errors:
const items = {
  'date': new Date(),
  'number': 2,
  'sampleString': 'test'
}
map() function will give you TypeError: items.map is not a function:
items.map(item => {})forEach() function will give you TypeError: items.forEach is not a function:
items.forEach(item => {})for..of will give you TypeError: items is not iterable:
for (const item of items) {}So, what can you do to iterate?
for (const item in items) {
  console.log(item)
}
You can also do ti by call Object.entries() function to generate an array with all its enumerable properties, and loop through that, using any of the above methods:
Object.entries(items).map(item => {
  console.log(item)
})

Object.entries(items).forEach(item => {
  console.log(item)
})

for (const item of Object.entries(items)) {
  console.log(item)
}
Map vs forEach in JavaScript – What Is the Difference?
One of my most loved functions in JavaScript might be map() and forEach. They both started to exist since ECMAScript 5, ores5 in short.
On that post, I am going to talk about the main difference between each and show you some examples of their usages.
Basically, looping over an object in JavaScript counts on whether or not the object is an iterable. Arrays are iterable by default.
map() and forEach() are included in the Array.prototype, so we don’t need to think about iterable. If you want to study further, I recommend you check out what an iterable object is in JavaScript!
What Are map() and forEach()?
map and forEach are helper methods in array to loop over an array easily. We used to loop over an array, like below, without any helper functions.
let array = ['1', '2', '3'];
for (let i = 0; i < array.length; i += 1) {
  console.log(Number(array[i]));
}
// >>>>>>>>>>>>>return values:
// 1
// 2
// 3
The for loop has been with us since the very beginning of the JavaScript era. It takes 3 expressions: the initial value, condition, and final expression.
This is a classic way of looping an array. Since ECMAScript 5, new functions have appeared to make our file more easier.
1.map()
map does exactly the same thing as what the for loop does, except that map creates a new array with the result of calling a provided function on every element in the calling array.
It takes two parameters: a callback function that will be invoked later when map or forEach is called, and the context variable called this argument that a callback function will use when it’s invoked.
const arr = ['1', '2', '3'];
// callback function takes 3 parameters
// the current value of an array as the first parameter
// the position of the current value in an array as the second parameter
// the original source array as the third parameter
const example = (str, i, res) => {
  console.log(`${i}: ${Number(str)} / ${res}`);
};
arr.map(example);
// >>>>>>>>>>>>>return values:
// 0: 1 / 1,2,3
// 1: 2 / 1,2,3
// 2: 3 / 1,2,3
The callback function can be used as below.
arr.map((example) => { console.log(Number(example)); })The result of map is not equal to the original array.
const arr = [1];
const new_arr = arr.map(d => d);
arr === new_arr; // false
You can also pass the object to the map as this argument.
const obj = { name: 'Christos' };

[1].map(function() {
  // { name: 'Christos' }
  console.dir(this);
}, obj);

[1].map(() => {
  console.dir(this);
}, obj);
The object obj became the thisArg for map. But the arrow callback function can’t get obj as its thisArg.
This is because arrow functions work differently from normal functions. Visit this article to see what’s different between arrow functions and normal functions.
2.forEach()
forEach is another looping function for an array but there’s a difference between map and forEach in use. There are two parameters that map and forEach can take — a callback function and this argument which they use as their this.
const arr = ['1', '2', '3'];
// callback function takes 3 parameters
// the current value of an array as the first parameter
// the position of the current value in an array as the second parameter
// the original source array as the third parameter
const example = (str, i, origin) => {
  console.log(`${i}: ${Number(str)} / ${origin}`);
};
arr.forEach(example);
// >>>>>>>>>>>>>return values:
// 0: 1 / 1,2,3
// 1: 2 / 1,2,3
// 2: 3 / 1,2,3
What’s different?
[1,2,3].map(d => d + 1); // [2, 3, 4];
[1,2,3].forEach(d => d + 1); // undefined;
forEach doesn’t ensure the immutability of an array if you change values inside an array. This method only ensures immutability when you don’t touch any values inside.
[{a: 1, b: 2}, {a: 10, b: 20}].forEach((obj) => obj.a += 1);
// [{a: 2, b: 2}, {a: 11, b: 21}]
// The array output has been changed!
So When to Use map() and forEach()?
Since the main difference between them is whether or not there is a return value, you would want to use map to make a new array and use forEach just to map over the array.
Here an example:
const people = [
  { name: 'Christos', whatCanDo: 'canDo1' },
  { name: 'George', whatCanDo: 'canDo2' },
  { name: 'John', whatCanDo: 'canDo3' }
];

 makeWorkers(people) => {
  return people.map((person) => {
    const { name, whatCanDo } = person;
    return <li key={name}>My name is {name}, I can do {whatCanDo}</li>
  });
}

<ul>makeWorkers(people)</ul>
On the other hand, forEach is useful when you want to do something with the data without creating a new array. By the way, the example could be refactored using filter.
subjects.filter(subject => mySubjectId.includes(subject.id)).length;
To summarise, I recommend you use map when creating a new array that you will use, and use forEach when you don’t need to make a new array, but rather, there’s something you want to do with the data.
Speed Comparison
Some posts mentioned map is faster than forEach. So, I was curious if it’s for real. I found this comparison result:

source : https://jsperf.com/foreach-v-map
The code looks very similar but the results are the opposite. Some tests said forEach is faster and some said map is faster.
Maybe you are telling yourself that map/forEach is faster than the other, and you might be right. I’m not sure, honestly. I think readability is much more important than the speed between map and forEach when it comes to modern web development.
But one thing’s for sure — both of them are slower than the built-in feature of JavaScript, for loop.
Conclusion
map and forEach are handy functions for looping over an iterable object and might beautify your code and give you more readability.
But one really important keynote to keep in mind is to understand what each does and when to use each.
map would be good when you want to make a new array that does not affect the original array, and forEach would be nicer when you just want to map over an array.
Resources:
When (and why) you should use ES6 arrow functions — and when you shouldn’t
Arrow functions are undoubtedly one of the more popular features of ES6. They introduced a new way of writing concise functions.
Here is a function how is written in ES5 syntax:
function calculateAge(birthYear) {
return 2020- birthYear
}

calculateAge(1984);  // 36
Now, here is the same function expressed as an arrow function:
const calculateAge = birthYear => 2020 - birthYear

calculateAge(1984);  // 36
It’s much shorter! We are able to omit the curly braces and the return statement due to implicit returns (but only if there is no block — more on this below).
It is important to understand how the arrow function behaves differently compared to the regular ES5 functions.
Variations
One thing you will quickly notice is the variety of syntaxes available in arrow functions. Let’s run through some of the common ones:
1. No parameters
If there are no parameters, you can place empty parentheses before = .
() => 36
In fact, you don’t even need the parentheses!
_ => 36
2. Single parameter
With these functions, parentheses are optional:
x => 36 || (x) => 36
3. Multiple parameters
Parentheses are required for these functions:
(x, y) => 36
4. Statements (as opposed to expressions)
In its most basic form, a function expression produces a value, while a function statement performs an action.
With the arrow function, it is important to remember that statements need to have curly braces. Once the curly braces are present, you always need to write return as well.
Here is an example of the arrow function used with an if statement:
let is_friend = (param) => {
  if (param === true) {
    return 'Can Join chat';
  } else {
    return 'No access on chat channel';
  }
}
5. “Block body”
If your function is in a block, you must also use the explicit return statement:
let addValues = (x, y) => {
  return x + y
}
6. Object literals
If you are returning an object literal, it needs to be wrapped in parentheses. This forces the interpreter to evaluate what is inside the parentheses, and the object literal is returned.
x =>({ y: x })7. Syntactically anonymous
It is important to note that arrow functions are anonymous, which means that they are not named.
This anonymity creates some issues:
- Harder to debug
When you get an error, you will not be able to trace the name of the function or the exact line number where it occurred.
2. No self-referencing
If your function needs to have a self-reference at any point (e.g. recursion, an event handler that needs to unbind), it will not work.
Main benefit: No binding of ‘this’
In classic function expressions, the this keyword is bound to different values based on the context in which it is called. With arrow functions, however, this are lexically bound. It means that it uses this from the code that contains the arrow function.
For example, look at the setTimeout function below:
// ES5
var obj = {
  id: 65,
  counter: function counter() {
    setTimeout(function() {
      console.log(this.id);
    }.bind(this), 850);
  }
};
In the ES5 example, .bind(this) is required to help pass the this context into the function. Otherwise, by default this would be undefined.
// ES6
let obj = {
  id: 65,
  counter: function counter() {
    setTimeout(() => {
      console.log(this.id);
    }, 850);
  }
};
ES6 arrow functions can’t be bound to a this keyword, so it will lexically go up a scope, and use the value of this in the scope in which it was defined.
When you should not use Arrow Functions
After learning a little more about arrow functions, I hope you understand that they do not replace regular functions.
Here are some instances where you probably wouldn’t want to use them:
- Object methods
When you call cat.jumps, the number of lives does not decrease. It is because this is not bound to anything, and will inherit the value of this from its parent scope.
let player = {
  lives: 3,
  jumps: () => {
    this.lives--;
  }
}
2. Callback functions with dynamic context
If you need your context to be dynamic, arrow functions are not the right choice. Take a look at this event handler below:
let button = document.getElementById('press');
button.addEventListener('click', () => {
  this.classList.toggle('on');
});
If we click the button, we would get a TypeError. It is because this is not bound to the button, but instead bound to its parent scope.
3. When it makes your code less readable
It is worth taking into consideration the variety of syntax we covered earlier. With regular functions, people know what to expect. With arrow functions, it may be hard to decipher what you are looking at straightaway.
When you should use them
Arrow functions shine best with anything that requires this to be bound to the context, and not the function itself.
Despite the fact that they are anonymous, I also like using them with methods such as map and reduce, because I think it makes my code more readable. To me, the pros outweigh the cons.

Some Useful Node.js Internal Modules
1. OS
JavaScript in Web browser cannot get the information about Operating System (OS) but node.js can
const os = require('os');

console.log('operating system information -------------');
console.log('os.arch()', os.arch()); // x64
console.log('os.platform():', os.platform()); // win32
console.log('os.type():', os.type()); // Windows_NT
console.log('os.uptime():', os.uptime()); // 53354.5432871
console.log('os.hostname():', os.hostname()); // DESKTOP-CPLOU
console.log('os.release():', os.release()); // 10.0.15063

console.log('path -------------');
console.log('os.homedir():', os.homedir()); // C:\Users\cplou
console.log('os.tmpdir()', os.tmpdir()); // C:\Users\cplou\AppData\Local\Temp

console.log('memory information -------------');
console.log('os.freemem():', os.freemem()); // 9122930688
console.log('os.totalmem():', os.totalmem()); // 17060175872- os.type() : Shows the Operating Systems type
- os.uptime() : Shows pc runtime after last reboot
- os.hostname() : Shows the computer name
- os.release() : Shows OS version
- os.homedir() : Shows home directory path
- os.freemem () : Shows available RAM
- os.totalmem() : Show entire memory capacity
2. Path
It helps manipulating folder & file path
- Path module is very useful because every Operating system has different path delimiter
- Windows type & POSIX type
- Window type : separated by ₩ (i.e., C:₩Users₩cplou)
- POSIX type is used in Unix based Operating system such as macOS and Linux
- POSIX type : separated by (i.e., /home/cplou)
const path = require('path');

const string = __filename;

// path.sep: /
console.log('path.sep:', path.sep);
// path.delimiter: :
console.log('path.delimiter:', path.delimiter);
console.log('------');
// path.dirname(): /Users/gp/Desktop/node_module
console.log('path.dirname():', path.dirname(string));
// path.extname(): .js
console.log('path.extname():', path.extname(string));
// path.basename(): path.js
console.log('path.basename():', path.basename(string));
// path.basename(): path
console.log('path.basename():', path.basename(string, path.extname(string)));
console.log('------');
// path.parse() { root: '/',
//   dir: '/Users/gp/Desktop/node_module',
//   base: 'path.js',
//   ext: '.js',
//   name: 'path' }
console.log('path.parse()', path.parse(string));
// path.format(): C:\users\cplou/pathjs
console.log('path.format():', path.format({
    dir: 'C:\\users\\cplou',
    name: 'path',
    ext: 'js',
}));
// path.normalize(): C:/users\\cplou\path.js
console.log('path.normalize():', path.normalize('C://users\\\\cplou\\\path.js'));
console.log('------');
// path.isAbsolute(): false
console.log('path.isAbsolute():', path.isAbsolute('C:\\'));
// path.isAbsolute(): false
console.log('path.isAbsolute():', path.isAbsolute('./home'));
console.log('------');
// path.relative(): ../C:\
console.log('path.relative():', path.relative('C:\\users\\cplou\\path.js', 'C:\\'));
// path.join(): /Users/gp/Desktop/users/cplou
console.log('path.join():', path.join(__dirname, '..', '..', '/users', '.', '/', 'cplou'));
// path.resolve(): /cplou
console.log('path.resolve():', path.resolve(__dirname, '..', 'users', '.', '/cplou'));- __filename, __dirname represents current file and current folder path respectively
- path:sep : path delimiter (i.e., Windows :
\, POSIX :/) - path.delimiter : env variable delimiter (i.e., Windows :
;, POSIX:) - path.dirname(path) : file Path
- path.extname(path) : file extension
- path.basename(path, extension) : file name
- path.parse(path) : separate the file path into root, dir, base, ext, name
- path.format(object) : path.parse() object to file path
- path.noramlize(path) : remove duplicates / \
- path.isAbsolute(path) : return boolean tells whether the file path is absolute path or relative path
- path.join(path, …) : combine into a path
- path.resolve(path, …) : combine into a path
difference between path.join & path.resolve
--
- path.resolve : absolute path
- path.join : relative path
path.join('/a', '/b', 'c'); // /a/b/c
path.resolve('/a', '/b', 'c'); // /b/c
3. Url
It helps manipulate Internet address (url)
- They are two types of url manipulation 1) WHATWG url 2) traditional node url
const url = require('url');
const URL = url.URL;
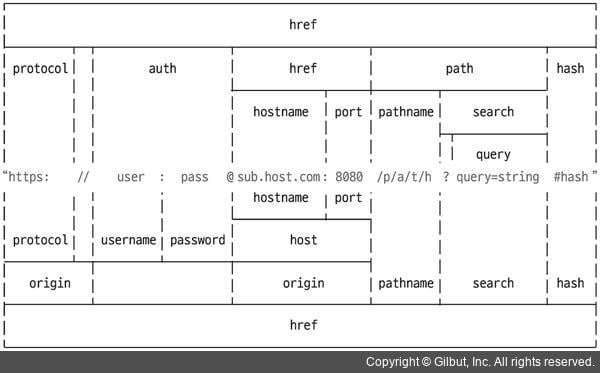
const myURL = new URL('https://christosploutarchou.com/posts/nodejs/#authentication-vs-authorization');
console.log('new URL():', myURL);
// new URL(): URL {
// href:
// 'https://christosploutarchou.com/posts/nodejs/#authentication-vs-authorization',
// origin: 'https://christosploutarchou.com',
// protocol: 'https:',
// username: '',
// password: '',
// host: 'christosploutarchou.com,
// hostname: 'https://christosploutarchou.com',
// port: '',
// pathname: '/posts/nodejs/',
// search: '',
// searchParams: URLSearchParams {},
// hash: '#authentication-vs-authorization' }
console.log('url.format():', url.format(myURL));
// url.format(): https://christosploutarchou.com/posts/nodejs/#authentication-vs-authorization
console.log('--------');
const parsedUrl = url.parse('https://christosploutarchou.com/posts/nodejs/#authentication-vs-authorization');
console.log('url.parse():', parsedUrl);
// url.parse(): Url {
// protocol: 'https:',
// slashes: true,
// auth: null,
// host: 'christosploutarchou.com',
// port: null,
// hostname: https://christosploutarchou.com',
// hash: '#authentication-vs-authorization',
// search: null,
// query: null,
// pathname: '/posts/nodejs//',
// path: '/posts/nodejs/',
// href:
// 'https://christosploutarchou.com/posts/nodejs/#authentication-vs-authorization'}
console.log('url.format():', url.format(parsedUrl));
// url.format():https://christosploutarchou.com/posts/nodejs/#authentication-vs-authorization- url.parse(address) : separate url
- url.format(object) : reassemble url
4. querystring
Convert searchParams of url into an object
const url = require('url');
const querystring = require('querystring');

const parsedUrl = url.parse('http://www.google.com/?page=3&limit=10&category=nodejs&category=javascript');
const query = querystring.parse(parsedUrl.query);
console.log('querystring.parse():', query);
// querystring.parse(): [Object: null prototype] { page: '3', limit: '10', category:
// [ 'nodejs', 'javascript' ] }
console.log('querystring.stringify():', querystring.stringify(query));
// querystring.stringify(): page=3&limit=10&category=nodejs&category=javascript